How To: Getting Started

by Michael Decipha Ponthieux
Posted: 2015-11-12
Last Updated: 2024-03-22


If you were directed here by decipha from your premium member thread jump down to the TunerPro RT Setup section.

#1 - Hardware - to communicate with the ECU

This goes without saying, before you can tune your ecu you must have hardware to physically plug in-to it. The best option is always REALTIME tuning. Unfortunately, only the 1983-2004 EEC-IV and EEC-V's equipped with a J3 port support realtime tuning via the use of a Moates QuarterHorse from Moates.net
CLICK HERE for the direct link.

The Moates Quarterhorse is ideal for the DIY tuner/racer, not only does it allow you to tune your vehicle it is also a SIGNIFICANTLY HELPFUL diagnostics tool allowing you to see what the computer see's!!!! The quarterhorse is an emulator which replaces the eeprom (ecu tune) with its own allowing realtime tuning. Although it can stay in the vehicle indefinitely, it was not designed to do so. It is recommended to replace the quarterhorse with a moates f3 chip after you have completed your final tune or remove the quarterhorse and flash you final tune to EEC-Vs using an OBD-II cable. In either case the EEC-IV and EEC-V alternately accept moates J3 chips on the back of the ecu in lieu of realtime tuning which is not recommended when realtime tuning is available.

Multi-Vehicles / Shops If you are only tuning one EEC then all you need is one quarterhorse. If you own multiple vehicles then be sure to order a Jaybird Chip Programmer and a couple F3 chips from moates.net when ordering the QH. When you are done tuning your vehicle you simply write your final tune to an f3 chip and you can then use your quarterhorse to tune another vehicle. If you have multiple vehicles that you will be continually making changes on then its ideal to own two quarterhorses so you do not have to remove it and burn a chip each time you begin tuning another vehicle. For shops, I recommend ordering 3 quarterhorses, 2 jaybirds, and 10 chips (thats how I roll). That way you are always prepared no matter what!!!

J3 Port - EEC-IV / EEC-V Only

The J3 port is the direct memory access connector on the rear side of of the ecu. On EEC-IV it is required to use this port for all custom tuning either with the quarterhorse emulator or with a memory chip. On EEC-V the J3 port is optional as OBD-II flashing is also possible. However, the J3 port is significantly faster and more capable than the OBD-II port and should be used for all custom tuning while dialing the tune in. Be ABSOLUTELY SURE that ALL OF THE FACTORY PLASTIC PROTECTANT COATING is removed from the J3 port otherwise odd engine behavior will result. On EEC-IV as well as EEC-V you should always read the ecu stock tune to verify it is communicating over the J3 port correctly. In some cases you can still have a poor connection and STILL receive a full read. In many cases a poor connection on the J3 port will cause the fuel pump to run constantly. In some rare cases especially more prevalent on EEC-V, the engine may stall when revving or datalogging may cut out. In any of these cases ALWAYS double check the J3 port is cleaned properly and all plastic has been removed.

OBD-II Flashing

OBD-II flashing is available on 1996-2020 vehicles and is the only means of reprogramming the 2005-2020 pcm's. I use and highly recommend the Mongoose Pro Ford made by Drewtech. Its a bit of an expensive piece but comes fully equipped and includes the 19v pull-up for reflashing ford PWM (1996-2004 EEC-Vs). There are other more affordable options but I have yet to try any so until then I can only recommend what works for me. If you try out one of the budget modules with success please do let me know and I will update this accordingly.
The OBD-II cable can also be used to flash FINAL tunes to EEC-Vs (1996-2004) as well. This will allow you to remove the QH and use it to tune another vehicle. However, the OBD-II cable DOES NOT SUPPORT REALTIME TUNING. It is NOT RECOMMENDED to tune EEC-V with an OBD-II cable only. A moates quarterhose is REQUIRED to realtime tune all EEC's.

PCMflash from ECUTOOLS.EU

In order to read and write through the OBD-II port you will need software to specifically do so. I highly recommend
PCMflash from ecutools.ru. The creator Oleg is a stand up guy and always happy to help out. You will need to order the dongle with the following modules for the specific vehicle you are tuning. I recommend just buying all 4 modules regardless.

Module #Year RangePCM Type
732018+Bosch MG1
022011-2017Tricore/Copperhead
212005-2010PowerPC
291998-2004EEC-V
291996-1997EEC-V (Read-Only)
At the time of writing this PCMflash only supports reading but not writing of 2 bank USA [94]-97 EEC-V.
Testing of the 94-95 early 88kb eec-v has not been done at the time.
If anyone has a diagnostics flashing read of an early eec-v please send it to decipha or oleg to get added to pcmflash correctly.

PCMflash - Reading Current Tune

To read your current tune from the ecu over OBD-II do the following: Note: In order to use a pcmflash tune read in TunerPro to realtime tune using the Moates QH your file will need to be re-arranged and possibly even strategy converted. See the
Disassembly Write Up for swapping the bank order of your file. In order to strategy swap your file a binary comparison will need to be done. Contact me for specifics.

#2 - Software - TunerPro RT

CLICK HERE to download TunerPro-RT
Next you'll need the software to modify your Quarterhorse / PCMflash tune and/or talk to the quarterhorse and override the stock calibration in the earlier ecu's. This is best achieved with TunerPro-RT. The latest version of TunerPro-RT can be downloaded directly from the TunerPro website by click the link above. NOTE: Do not download TunerPro, instead download TunerPro RT. The software is FREE but if you enjoy it I highly recommend paying the measly donation to get rid of the annoying pop up everytime you open it. TunerPro RT can be installed on all your laptops and desktops for ease of tuning flexibility. TunerPro RT works with ALL PCM's for all manufacturers but requires a suitable XDF.

TunerPro RT Setup for Moates QuarterHorse / Jaybird / SuperLogger (EEC-IV / EEC-V)
DO NOT enable Dual-Emulator (16 bit) under the Emulation Plug In Component. Doing so will prevent the QuarterHorse from connecting.

.XDF File - Load in your Definition File

The .xdf file is the definition file for your strategy. See the
EEC Master Hardware List for all currently supported PUBLIC strategies and download the correct definition file for your specific strategy. If you do not see your strategy listed publicly then you must become a PREMIUM MEMBER to get your strategy file.

After you have downloaded the strategy file, unzip the file and double-click on the .xdf file to load it into tunerpro. If it doesn't open up in tunerpro when you double click it then that means you failed to setup tunerpro correctly ABOVE.

.ADX File - Load in the ADX Datalogging File (Quarterhorse users only)

On the homepage under the downloads section be sure to download the ADX files for your strategy as well as for the superlogger or quarterhorse. Although all of the files are exactly the same, the selections for the specific setup is already pre-configured to make it easier to jump right in to tuning. Download your specific ADX file from the downloads section on the homepage where you got the XDF file. After you download it, unzip the file then double-click on the .adx file to load it into tunerpro. Again, if it doesn't automagically load into tunerpro you did not configured tunerpro correctly according to the setup configuration listed above.

.BIN File - Load in your tune / calibration (Custom Tune)

The .bin file is the actual tune file. If you already have your .bin file simply double-click it to load it into tunerpro.
If you do not have a .bin file (tune file) you can download a base tune or stock tune file from the homepage under downloads.

Moates Hardware - FTDI Driver

The FTDI Driver is required to use moates devices such as the quarterhorse. You can download the latest and greatet D2XX Driver from the link below.
https://ftdichip.com/drivers/d2xx-drivers/ After you've downloaded the driver, you will need to go to device manager and find the ftdi device which is the qh. Plug the Qh in to make it appear. Click on properties and update the driver manually to the search path you downloaded the driver files to.

If you were directed here by decipha from your premium member thread, after loading in the XDF ADX and BIN in TunerPro, jump down to the Writing Tune section.

SuperLogger Configuration

When using a moates superlogger, you cannot read and write the QH directly while connected to the superlogger. To read/write tunes to the QH, you must set the superlogger side switch to the bypass position to bypass the superlogger. When you initialize hardware the quarterhorse will be identified when the switch is in the bypass position. Be sure to verify you are using the QH datalogging adx when interfacing the QH directly and the SL adx when datalogging the SL. At this time, realtime emulation is not available while interfacing through the superlogger.

EEC-V Only - Read out your current tune (for reference data only)

This is NOT required for EEC-IVs. If using a SuperLogger, the side switch must be set to bypass to connect to the QH.
For EEC-Vs with PATS (excluding Marauders), you will need to read out the current tune to copy over your PATS code and VIN number for your new custom tune file or to begin tuning from your existing tune file.

If tuning an older EEC-IV ecu you can skip this section and shoot on down to
Calibration.

If tuning with a chip using a JAYBIRD skip on down to Reading Chip with Jaybird.

If tuning over OBD-II and you hadn't read out your tune yet, scroll back up to OBD-II - Reading

Note: If your ecu is NOT currently running a tune with the same strategy that you will be using then the binary will show corrupt data due to being a different strategy. As with any tuning software, make sure you NEVER edit a value that does not appear to be correct as that will corrupt your tune.

For Reading out your current tune using the Quarterhorse do the following:

EEC-V - 1996 - 2004 Vehicles; includes up to 2006 Ranger and 94+ V6 Tbird/Mustang

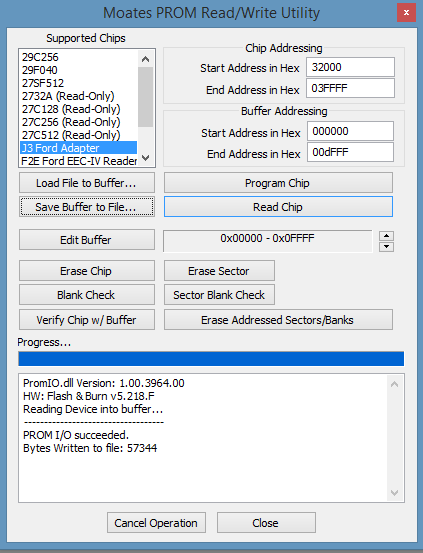
select F2E Ford EEC-V Reader

start address 0000000
end address 003FFFF (note there are four F's)

buffer address start 0000000
end address buffer 003FFFF (note there are four F's) >> 256k multi-bank file (All 1996 - 2004 vehicles)

turn ignition key on
click on "read chip"
after its done reading and the progress bar completes, turn the ignition off
now click on save buffer to file
it will show bytes written 262,144 k at the bottom


EEC-IV - 1983 - 1995 Vehicles; includes up to 1997 larger trucks

If reading out a single bank binary, set the
start address 000000
end address buffer 00DFFF >> 56k single bank file (1983 - 1993/95 vehicles)

Reading Chips - JAYBIRD

If using a jaybird programmer to read a chip you must do the following: TPRT 56k Chip Read

Reading Existing Tune

If upgrading to TunerPro RT from other software platforms that support the quarterhorse you can read the calibration from the quarterhorse in to TunerPro. Simply verify that you have written your tune to the following quarterhorse mode/position.
Write Existing Tune to the default Tune Slot to be read into TunerPro RT.
1 BankMode 2Tune 7
2 BankMode 3Tune 4
4 BankMode 4Tune 2
After you have written your tune to the quarterhorse close your software and open TunerPro RT. Click initialize hardware to connect to the quarterhorse. Now click the "Download Current Bin From Emulator to File" button just right of the download button. Follow the prompt to save your current tune.

Calibration - Base Calibrations are Available on the Homepage

Check the homepage to see if a base tune is applicable to your setup before proceeding. If you are getting a custom base tune then this does not apply to you. If you have an 89-93 foxbody ecu then I highly recommend starting from the A9L2 Base Calibration. If you have an 94-95 cbaza ecu then I highly recommend starting from the T4M2 / U4P2 Base Calibrations. If you have an EEC-V then you will need to verify all the parameters are set correctly in your tune according to the EEC-V Critical Calibration Parameters.
See the homepage >> downloads section for all publicly available supported strategies. If your vehicle is not listed, a custom base tune and limited support can be created. Contact me for more details.

DIY Tuning - Editing your Custom Tune - Parameter Category Tree View

Once you've downloaded your base tune unzip it and double click on the .bin file to load it in to tunerpro to begin tuning. If you've setup tunerpro correctly it will automatically open and load the .bin file (tune file) into tunerpro when you double-click the .bin file. The tune file name will now be displayed at the top title bar of tunerpro. If it is not, scroll back up and repeat the
TunerPro RT Setup. Once your .bin (tune file) is loaded into TunerPro RT, make your required changes as outlined in the base calibration write up. To navigate TunerPro RT the tree view must be set to Parameter Category by selecting category view from the drop down menu.
TunerPro RT Parameter Category Tree View

PCMflash - OBDII - Writing (1998-2020)

If writing your existing EEC-V tune to the ecu you will need to disable datalogging first. Then you will need to re-arrange your bank order and remove the null filler to coincide with the file configuration PCMflash requires to write tunes.

I have created batch scripts FREE-OF-CHARGE to automatically convert files for you.
CLICK HERE to download it.
See the PCMflash bank order needed in the Disassembly Write Up for details IF you wish to know the technical details (not required).

To flash your custom tune to the ecu over OBD-II do the following:
For OBD-II datalogging skip on down to Datalogging

Enable Datalogging (Quarterhorse ONLY)

IF YOU RECEIVED A CUSTOM TUNE FROM DECIPHA DIRECTLY DO NOT ENABLE DATALOGGING AS IT IS ALREADY ENABLED AND MOST LIKELY HAS NEWER CODE, IF YOU OVERWRITE THE DATALOGGING CODE IT CAN CAUSE ISSUES. For realtime tuning with a Quarterhorse, to datalog you must first enable datalogging in your custom tune file. In TunerPro hold down Ctrl and press the F key to bring up the Find/Search box. Type in "datalog" and press enter, you will see the "Enable DMA Datalogging Patch" show up in the listing box. Double click on it and the Patch will now pop up in a selection box. Click on "Patch" to enable Datalogging and then click "Apply" to verify you want to save your changes.
TunerPro RT Find Box

Be sure to always verify you have the latest Universal ADX Datalogging File from the homepage under downloads as it is updated often. After you have verified your ADX and XDF files are the most recent.
Now that you have datalogging enabled in your tune and have verified that you have the correct ADX datalogging file loaded into tunerpro, save your current tune file with todays date (for ease of keeping track of updates).

Writing Tune to QH

REMEMBER: Always write your tune before turning the key on.

TunerPro RT Write Tune

<---------------------------------------------------------Write tune to Quarterhorse------------------------------------------------------------->
Before writing, its always wise to first verify the correct tune filename is loaded into the title bar up top in TunerPro RT.
--------> IF IT IS NOT, click on File >> Open Bin, browse to your tune file and double click it to open it, its filename will now be loaded into the title bar up top in TunerPro RT
now click up top on tools >> initialize emulation hardware
then click on the blue up arrow to write/upload the current tune to the quarterhorse

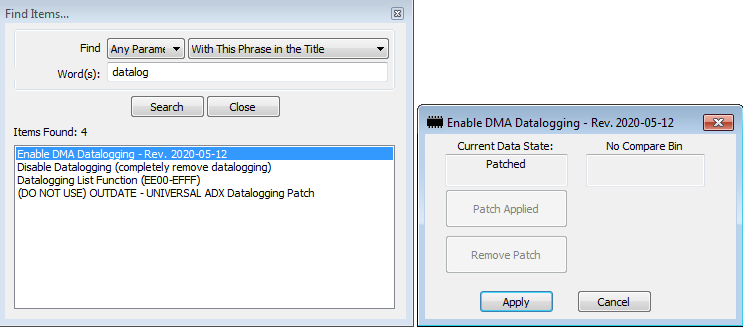
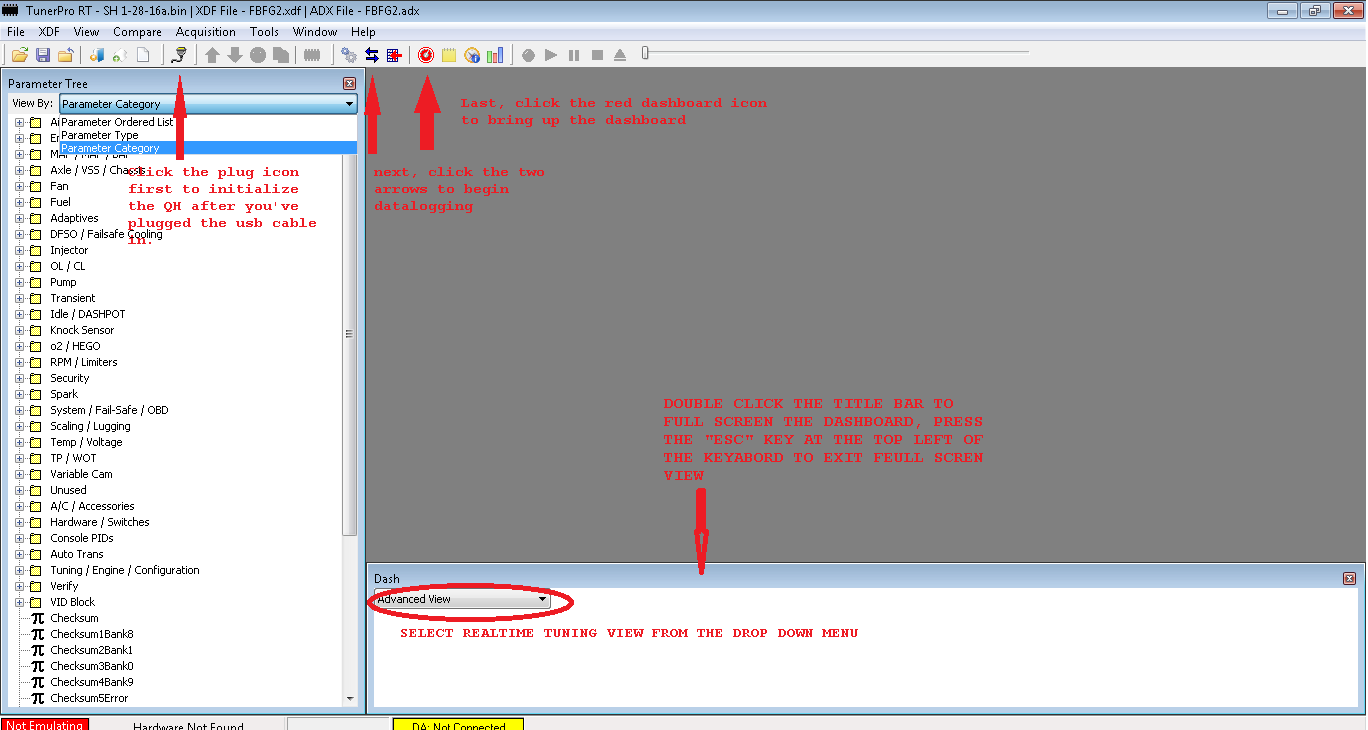
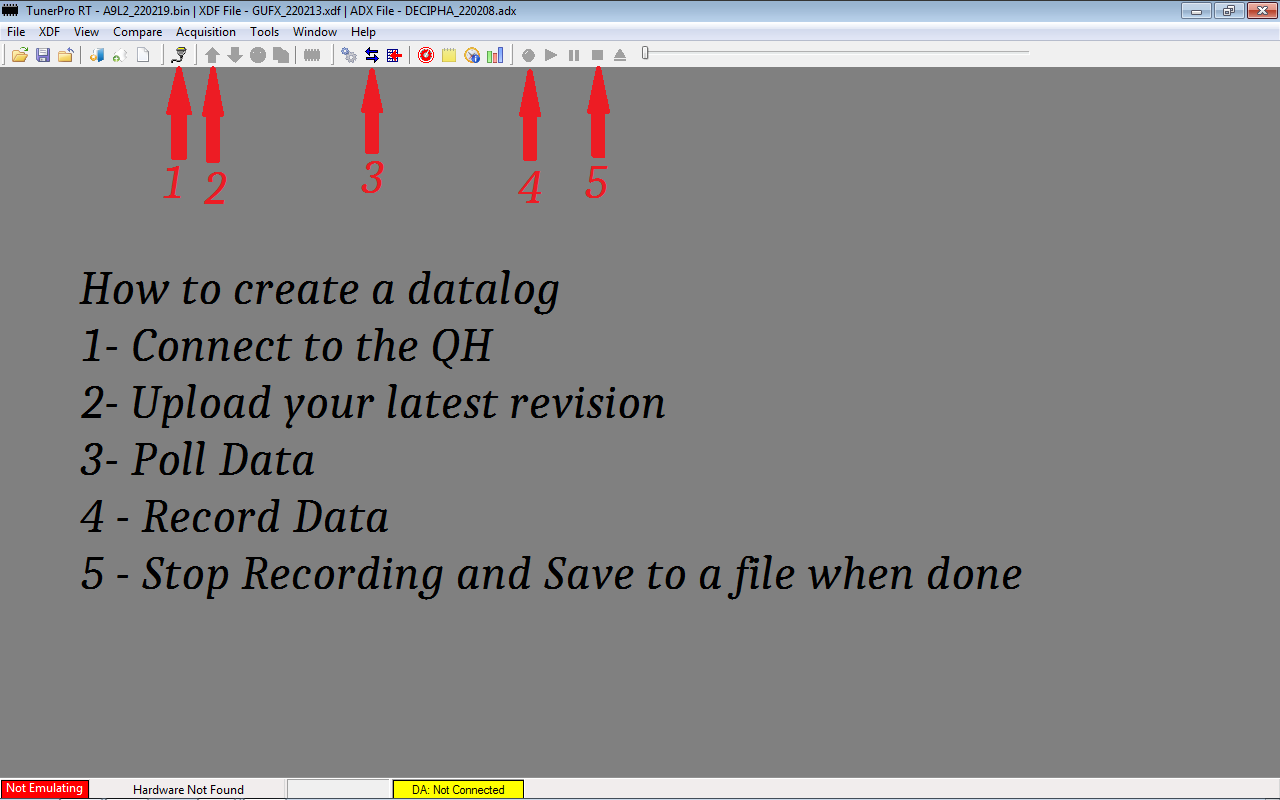
SuperLogger Datalogging

SL Use Only If using the superlogger, you must have the datalogging send command list visible to setup the superlogger. Failure to do so will result in no data being polled and all payloads on the dash will be shown at maximum values.
  • First, verify the superlogger side switch is in its native Superlogger position
  • Load in the "SL" adx file to communicate with the superlogger
  • In Tunerpro click up top on View >> Toolbars >> Data Acquisition Send Command
  • select "SL_Initialize_Settings" from the drop down menu and click send
  • select "SL_DR Macro: Configure SL for Payload
  • Press the log button on the superlogger to enable datalogging
The dashboard should now come to life and show valid live data (as long as the key is on). The above steps will most likely be remedied in time but for now its required. The initialize only has to be configured once. The superlogger will continue to keep that configuration until it is disconnected physically.

OBD-II & QH - Datalogging

Now that you have TunerPro RT setup correctly and your tune patched for datalogging simply do the following:
Look up top in the title bar of TunerPro and verify you have the correct ADX loaded.
....Verify it has the correct Strategy name in the title bar specific to your application.
click the initialize plug icon (if the hardware is not yet connected).
Your hardware information will show up at the bottom left of tunerpro
click on the two cross arrows to poll data
you will now see "DA Connected" highlighted at the bottom of tunerpro. If not, go back up to
TunerPro Setup to set up tunerpro correctly.
click on the red dashboard icon to bring up the dashboard. Be sure to select your dasboard type from the dashboard drop down menu: EEC-IV, EEC-V, OBD-II, etc...
NOTE: Although TunerPro is showing live data it IS NOT recording the data.

TunerPro RT Datalogging

Verify Communications

Before attempting to start the vehicle when using the J3 port (moates equipment) be sure you are communicating correctly across the J3 port. To verify, simply bring up the dash while polling data and press the throttle pedal while watching to see if the relative throttle position sweeps on the dash. If the throttle position does not change on the dash while pressing the pedal then DO NOT ATTEMPT TO START THE VEHICLE. The most usual cause for no communication is due to a dirty or improperly cleaned J3 port. Remove the ecu from the vehicle, detach the J3 device and be sure to double scrape all of the factory plastic protectant off of the j3 port terminals top and bottom using a razor blade.
NEVER CONNECT OR DISCONNECT ANYTHING FROM THE J3 PORT WHILE THE ECU IS POWERED UP AS IT WILL FRY BOTH COMPONENTS.

In some cases (especially so on EEC-V) the quarterhorse may loose configuration while still connected to the j3 port. This may happen due to writing a tune while the engine is running or even connecting the quarterhorse for the very first time.

In these cases the QH configuration can be reset in tunerpro by clicking the "Verify Emulator Ram Contents Against Current Bin" icon located 3 icons down from the upload icon. You will probably have to click this button twice as the first time you click it the QH will "default" and then the second time it will read which will probably show an error at the bottom status indicator which is normal. Simply upload the tune and all should be fine.

VERIFY Wideband Transfer

Now that you are datalogging give it a few minutes for the awe factor to wear off. After the wow factor dissipates, select your wideband on the dash by right clicking it and selecting the correct wideband from the drop down menu. This is only applicable if you have wired the widebands 0-5v output in to the ecu's egr valve positions 0-5v input wire. See the
Logging Inputs Write Up for more details and to VERIFY your widebands transfer function. Be sure to let your tuner know of the transfer your using along with any errors in the transfer if you are getting a REMOTE TUNE.

Recording Datalogs

Now keep in mind unlike most other software that begins saving a log file anytime you are polling data TunerPro RT gives you much more advanced control. You can start and stop a log at any time you like by simply clicking the red record icon to begin recording a log. When you are finished creating that specific log, simply click the Stop icon and TunerPro will ask you where you would like to save the newly created log file. The logging still continues! When saving the log, I highly recommend saving them to the desktop for ease of locating and name it the current tune file your using.
TunerPro RT Datalogging

TunerPro also allows playback of the log with realtime viewing which makes it especially convenient since the realtime monitor is used for the actual playback. Note: By using the [ and ] keys on your keyboard above the Enter/Return key you can move the log forwards and backwards. Holding the shift key while pressing thiese keys will reduce the speed at which the log moves along at.

Dashboard is Missing?

If for any reason the dashboard disappears and will not pop up when the dashboard icon is clicked in tunerpro it can simply be recovered by pausing your mouse over the tunerpro icon in the taskbar at the bottom of your screen. As you hover the mouse pointer over the tunerpro icon in the taskbar you will see two thumbnail windows displayed, often tunerpro the program itself on the left and the dashboard view on the right. Simply move the mouse point over to the right thumbnail window that shows the tunerpo dashboard. Right-click on the thumbnail and click on maximize. The window will be restored to its full glory. The reason for this is unknown but until its figured out this is the easy work around.

Quarterhorse Latency - Speed Up Reading & Writing to the QH

<<<----Secret Level Stuff--- >> Set Latency to 4 in Device Manager---->>>
This is NOT REQUIRED but is HIGHLY RECOMMENDED to make the QH read and write faster.
Right-Click on My Computer and go to Properties
Click Device Manager
find your FTDI device which is your Quarterhorse
Click on Properties
Scroll over to the Advanced tab
Scroll down to Latency
set latency to 4

Save your changes and enjoy the fast reading and writing of the quarterhorse BE AWARE: Setting the latency too low can result in connection errors and cause drop outs (disconnecting), glitching in data logs, lost time in datalogs, etc... If you encounter any of these problems INCREASE the latency.

Note: Windows may ask you to restart your computer, it is not needed.

If you have any problems what so ever with the TunerPro RT setup for the QuarterHorse, post your questions ON THE FORUM.


Jaybird - Writing F3 Chip
Writing the chip is similar to reading as you use the same addressing except you must erase the chip first before you can write it.
The following steps outline how to write a chip. Set the addresses as outlined for your specific bank count ecu (1, 2 or 4).
CHIP WRITING ADDRESSES
Chip Address
Buffer Address
BanksStartEndStartEnd
10x00 320000x00 3FFFF0x00 00000x00 0DFFF
40x00 000000x00 3FFFF0x00 00000x00 3FFFF

TPRT 56k Chip Read